Saturday, October 18, 2014

Shader fun


I've recently been trying to consolidate my shader management code. I've been migrating Clayworks from fixed platform purgatory on DirectX to multi-platform nirvana using OpenGL/GLES2. I've wanted to do this for ages but other work always took priority.  I'd laid the ground work fairly well by abstracting off a central graphics context class - not as a virtual interface but as a static interface layer between the system graphics library and my own code, with lots of helper functions built in for my particular needs and a small sub set of platform dependent code.

Implementing the OpenGL version took a lazy week of evening hacking while on holiday. It was quite satisfying to see Clayworks start up and know that it's nearly defenestrated. That's not to say that it won't be on windows, it's just that it won't be stuck there.

These days, OpenGL and DirectX are mostly just a thin layer of glue between application code and shaders. This may all change if ATI's Mantle gains traction (and I certainly want use it) but converting between one set of calls to create vertex buffers and another is just a bit of boilerplate work - it takes as long as it takes but it's hardly interesting or challenging.
The difference between shader languages is a little more involved. I have a set of GLSL shaders and HLSL shaders that do similar (but not quite the same) things. GLSL is a more streamlined language than HLSL (or nVidia's cg, which is really similar) and that its advantages, particularly for driver writers.
Unfortunately, there's a lot of inconsistency in quality and in my work on ExoMiner, I found it necessary to add functionality for including files (there's no #include in glsl) and also optimization (some mobile platforms just don't do it - I've been using the GLSL optimizer project). For the Clayworks OpenGL push, I wanted to take that a bit further.
Clayworks (and ExoMiner) makes use of material objects for surface shading. These are objects that are shared between many instances that describe surface rendering properties. Previously, adding a new material in Clayworks was tedious: I'd have to create a new c++ class, add a bunch of properties and then manually match these up with shader constants. It's another one of those things I've been meaning to rewrite for a while - shaders and other scripts should make development more fluid but when you have to write hand crafted C++ boilerplate, it becomes slow and tedious.
I thought that this would be the ideal time to investigate ways of automating this process for Clayworks and Exominer (which uses a different engine). The fly in the ointment here is that the platform I'm converting from (DirectX/HLSL) has far better tools built in for this than the platform I'm converting to (OpenGL/GLSL) in the form of semantics and annotations - features that, for whatever reason, I haven't made use of until now.
As I mentioned before, GLSL is rather minimalist so if you want fancy features like annotations then you'd better write them yerself. I did google for prior work (and I'm sure people have done this sort of thing before, even if they aren't sharing) but the best I could come up with were some 10 year old discussions that ended acrimoniously.


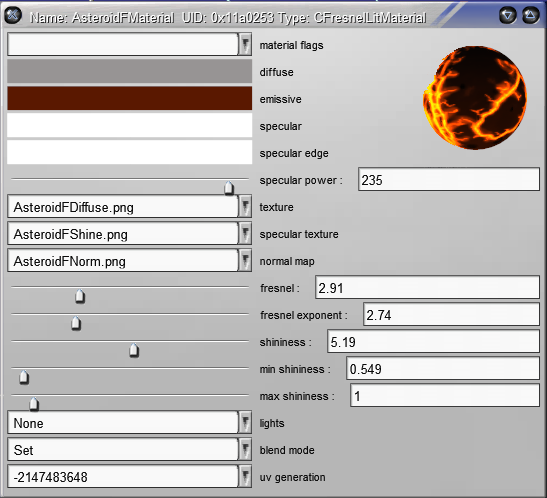
Now created with less tedium - new shaders can be edited and their properties updated whilst the game or editor is running

Here's some example GLSL annotations. This won't compile in vanilla GLSL or in HLSL (thanks to the 'uniform', 'lowp' and 'vec4' keywords, which aren't part of GLSL.


uniform lowp vec4    material_diffuse  : DIFFUSE  < string Object = "Material";  string UIName = "Diffuse";  > = {1,1,1,1};
uniform lowp vec4    material_specular : SPECULAR < string Object = "Material";  string UIName = "Specular"; > = {1,1,1,1};
uniform lowp vec4    material_specular_edge : SPECULAR < string Object = "Material"; string UIName = "Specular Edge"; > = {1,1,1,1};
uniform lowp vec4    material_emissive : EMISSION      < string Object = "Material";  string UIName = "Emission";  > = {0,0,0,0};
uniform lowp vec4    material_ambient  : AMBIENT       < string Object = "Material"; string UIName = "Ambient"; > = {1,1,1,1};
m lowp vec4    material_specular_edge : SPECULAR < string Object = "Material"; string UIName = "Specular Edge"; > = {1,1,1,1};
uniform lowp vec4    material_emissive : EMISSION      < string Object = "Material";  string UIName = "Emission";  > = {0,0,0,0};
uniform lowp vec4    material_ambient  : AMBIENT       < string Object = "Material"; string UIName = "Ambient"; > = {1,1,1,1};

Note that the default values (e.g. {1,1,1,1}) have curly braces. Apparently, the form 'vec4(1,1,1,1)' is also allowed although I've yet to implement this.
The default values are parsed and stored by the preprocessor and then stripped out rather than let the driver handle these. As mentioned here, some drivers do not implement these correctly.

I considered a few different options for annotations but decided that, seeing as it was a standard of sorts already, I'd try and implement the SAS system used in HLSL and cg. I should mention that at this point, my intention was to write the simplest piece of code I could to parse out annotations from the source and then spit out some nice, simple HLSL code. I did not intend (honestly now) to write a C style preprocessor, a full expression evaluator and a tight bit of code that can happily and efficiently make sense of and build an Abstract Syntax Tree out of just about any shader you care to throw at it. This is what we generally refer to as 'feature creep' but I swear to goodness that it was the devil in the details that made me do it.

In trying to parse the code, I found that it was necessary to understand various forms of type declaration, determine which object were arrays, what the size of those arrays was (which required me to write a full C style preprocessor as my shaders had some funky macros in them) and handle defaults (which some GLSL implementations fail to handle correctly, so best do them here and strip them out).
The now allows me to write SAS style annotations in GLSL code, which makes authoring shaders in Clayworks much easier. Whereas previously I had to write a lot of tedious boilerplate code, now it's just a little addition to the shader file and the material is ready to edit; it's even possible to edit the shader while the program is running and have that change the list of tweakable properties. All of the serialisation of material settings 'just works' automagically too, which is nice.

I didn't use flex/bison to do the AST construction (like I said, I was trying to 'keep it simple, stupid' and the output of flex ain't pretty) but it works and the code is quite clean. I may end up using the those tools eventually as every other shader parser I've seen (Angle, GLSL optimizer) makes use of them.

Which brings me to an observation - whilst a lot of this preprocessing is a production phase (products likely ship with optimized or even obfuscated and/or binary shaders), these shaders are being parsed around four times - once by my preprocessor, another by the optimizer, then (on windows) by Angle and finally by the driver itself. This seems a waste to me and I'd rather these disparate steps shared data structures. It'd be good to try and integrate these projects. I intend to open source this piece of work on github. I've made a repro here, although it's empty at the time of writing. I have to extract the code from my own libraries first.

The next step is to make the code parse full HLSL code and spit out GLSL, grabbing techniques and pass information as it does so. Clayworks does make extensive use of those features so rather than re-implement all those shaders, it'll be less work to write an interpreter for HLSL. That will have to wait for a little while though as I've achieved the original goals for this project and there are only so many hours in the day.


Please let me know if you're aware of any open source libraries with the same aims that already exist.


Close but no cigar

Close but no cigar
Some experiments don't end in a successful result but are kind of successful anyway. Today's diversion was one of these. I'd toyed with the idea of building a helper header file that would allow me to compile GLSL code in C++, which would have found numerous uses in ExoMiner. Baring a few constraints, that task has been a success.
  However, the biggest stumbling block came after the initial success as a seemingly identical image slowly filled up an image buffer. The two images are close but, alas, not identical. The basic impression of the shader, which is one of the most complicated in the game, has been successfully reproduced. Unfortunately, they need to be identical so this isn't of any use for the particular problem I'm trying to solve.
  The problem is with differences between the floating (or possibly fixed) point number implementations on the GPU and on the CPU - small differences in these can lead to big differences when you're generating random numbers. This is why when building a procedural world in a game like minecraft, running the generator with the same seed on different platforms can yield very different random worlds, whilst still following all of the rules for building that world.  Similarly, the two galaxies both work but they're both different places. If you're wondering: yes, you can zoom down to each star and they all have solar systems, all 20 million of them - that's for the next blog post however.

Whilst it's hardly complete, below you'll find he helper header I've used to enable me to compile that particular GLSL shader. There are a few gotchas - I couldn't get vertex swizzling to work with my vector classes as the GLSL vector swizzlers (e.g. 'vec.xy', 'vec.zw' etc.) aren't functions but a special case of structure access. Using anonymous unions within a struct might do it for contiguous elements but that would mess up constructors, which are also required by the syntax.

 For many shaders though, just include this code, initialise your shader variables and pick up the result in 'gl_FragColor'. This was designed for shaders run as full-screen rectangles such as would be used for generating textures or ray casting scenes, although it could be adapted for a full rasterizer.

 One thing this code isn't is fast: it's a proof of principle and is unoptimized. It's a clear candidate for implementation in a parallel library such as TBB. Also, obvious optimizations such as passing larger objects by const reference were omitted due to the fact that GLSL doesn't bother with that sort of thing and I wanted to compile the code within C++ with as little massaging as possible.

 Despite having made no real attempts at optimizing anything, the tremendous speed difference between the CPU and GPU has given me renewed respect for the GPU engineers, as well as the author of the shader optimizer.

//--------8<--------- start glsl helper include file ------------------------------------------------


    inline float pow(float v, float exp) { return ::powf(v, exp); }
    inline vec2 sin(const vec2 &a) { return vec2(::sinf(a.x), ::sinf(a.y)); }
    inline vec3 sin(const vec3 &a) { return vec3(::sinf(a.x), ::sinf(a.y), ::sinf(a.z)); }
    inline vec4 sin(const vec4 &a) { return vec4(::sinf(a.x), ::sinf(a.y), ::sinf(a.z), ::sinf(a.w)); }
    inline vec2 cos(const vec2 &a) { return vec2(::cosf(a.x), ::cosf(a.y)); }
    inline vec3 cos(const vec3 &a) { return vec3(::cosf(a.x), ::cosf(a.y), ::cosf(a.z)); }
    inline vec4 cos(const vec4 &a) { return vec4(::cosf(a.x), ::cosf(a.y), ::cosf(a.z), ::cosf(a.w)); }
    inline vec2 fract(const vec2 &a) { return vec2(fract(a.x), fract(a.y)); }
    inline vec3 fract(const vec3 &a) { return vec3(fract(a.x), fract(a.y), fract(a.z)); }
    inline vec4 fract(const vec4 &a) { return vec4(fract(a.x), fract(a.y), fract(a.z), fract(a.w)); }
    inline vec2 floor(const vec2 &a) { return vec2(::floorf(a.x), ::floorf(a.y)); }
    inline vec3 floor(const vec3 &a) { return vec3(::floorf(a.x), ::floorf(a.y), ::floorf(a.z)); }
    inline vec4 floor(const vec4 &a) { return vec4(::floorf(a.x), ::floorf(a.y), ::floorf(a.z), ::floorf(a.w)); }
    inline vec2 clamp(const vec2 &v, float a, float b) { return vec2(clamp(v.x, a, b), clamp(v.y, a, b)); }
    inline vec3 clamp(const vec3 &v, float a, float b) { return vec3(clamp(v.x, a, b), clamp(v.y, a, b), clamp(v.z, a, b)); }
    inline vec4 clamp(const vec4 &v, float a, float b) { return vec4(clamp(v.x, a, b), clamp(v.y, a, b), clamp(v.z, a, b), clamp(v.w, a, b)); }
    inline float mod(float a, float b) { return ::fmod(a, b); }
    inline vec2 normalize(const vec2 &v) { return v.Normal(); }
    inline vec3 normalize(const vec3 &v) { return v.Normal(); }
    inline vec4 normalize(const vec4 &v) { return v.Normal(); }

    template <class t="">
    inline T smoothstep(const T &edge0, const T &edge1, float x)
    {
        // Scale, bias and saturate x to 0..1 range
        x = clamp((x - edge0) / (edge1 - edge0), 0.0, 1.0);
        // Evaluate polynomial
        return x*x*(3 - 2 * x);
    }

    template <class t="">
    inline T mix(const T &edge0, const T &edge1, float x)
    {
        return edge0 + (edge1 - edge0) * x;   
    }

    inline vec3 operator * (const vec3 &v, const mat3 &mat) { return mat.PostMultiplyVector(v); } //pre
    inline vec3 operator * (const mat3 &mat, const vec3 &v) { return mat.PostMultiplyVector(v); }

    vec4 texture2D(const sampler2D &sampler, const vec2 &pt, float bias = 1.0);
    vec4 texture2D(const sampler2D &sampler, const vec3 &pt, float bias = 1.0);

    extern vec4 gl_FragColor;
    extern vec4 gl_FragCoord;
    extern float gl_FragDepth;
}
//--------8<------------------------ end glsl helper include file --------------------------------


for (int y = 0; y < imagedata->mHeight; ++y)
{
        glsl::gl_FragCoord.x = 0.0f;
        for (int x = 0; x < imagedata->mWidth; ++x)
        {
            glsl::gl_FragColor = glsl::vec4(0, 0, 0, 0); //initialise the fragment colour
            glsl::main(); //run the shader

            glsl::gl_FragColor = glsl::vec4(glsl::gl_FragColor.w, glsl::gl_FragColor.z, glsl::gl_FragColor.y, glsl::gl_FragColor.x);             //have to swap the channel order

            *pixels = glsl::gl_FragColor.ToDWORDsat(); //saturated 4 float colour to

            ++pixels;
            glsl::gl_FragCoord.x += 1.0f; //move to the next pixel to the right
        }
        glsl::gl_FragCoord.y -= 1.0f; //move to the next scanline (flipped in the y-axis)
    }

<!--------------------------end--></class></class><!--------------------------start-->

Wednesday, March 5, 2014

Exo miner progress


Last week, we posted the first video of our game on to our steam greenlight page to try and drum up some more interest.  That involved the small matter of writing the code needed to output video from our engine. Fraps is OK and all but couldn't show the game off as well I wanted. First,  I had to write a system to first record user input and play it back reliably. Writing a system like this is fairly straight forward if all of the user input interaction between the OS and your framework happens in one place - you just pick off the events, add a time-stamp and save them off to a file.

  However, you have to be careful that there aren't any factors that could change the way the game plays on playback as things tend to desynchronise really easily and you'll find yourself with a video of a spaceship spasmodically twitching around, which doesn't make for very interesting viewing.  I had to go through the engine purging any references to system time, making sure all time-based calculations went through a managed 'game time' and lots of other annoying little things that were causing chaotic butterfly effects in the playback.

  Once the playback feature was working, then it was just a case of spitting out a stream of images which I could paste together in to a video. However,  there were quite a few graphical loose ends - little things that were too small to merit much attention when there were more important game-play issues to attend to but which suddenly because much more important now that we were actually going to show things off.  I get a kick out of graphics work so not spending all my time tweaking the visuals is an attempt at professionally disciplined time management.  It's been rather nice to have the excuse to make things as pretty as possible and I had a busy, productive week.

  Now we're on to the next video which will show some of the deeper game play that we're eager to show off. Again, this gives me the excuse to make things pretty and I've been replacing place-holders and polishing the textures (actually, more time was spent un-polishing them - scuffed gloss maps look nice). I've worked out a pretty good pipeline for creating assets quickly and I've added a bunch of new UV editing tools to Clayworks to help me do this - these are tasks that I've wanted to get on with for a long time but couldn't spare the time. I usually have to justify doing things I want to do to myself, like some sort of annoying internal schizophrenic producer alter-ego.
 
Refinery being modelled in ClayWorks
This was a lot of fun to model and texture.  I'm really looking forward to showing this bad boy off in the game. It's going to form part of the mining and refining mechanic in the game but more on that when we release the new video - which, now that I've got all that fiddly recording and playback code written, should be along soon!


Tuesday, February 11, 2014

Greenlit!

Exo-Miner


Not so much of a programming entry, more that I'm rather chuffed that we've finally decided on a name for our game. We've been using the working of 'SolarEscape' for ages but when you google that, you get a whole bunch of tanning salons pop up and anyway, the game's scope now goes way beyond just escaping the sun.
  Anyway, SolarEscape is now Exo-Miner which neatly describes what you do and rolls off the tongue quite nicely. In the game you'll explore procedurally generated solar systems, prospect asteroids and defend your patch against rival factions.
  The title screen image was created using a combination of Clayworks for the modelling, the game engine itself for the procedural nebula in the background and blender+cycles for rendering and composition.

More on this soon!

Tuesday, January 7, 2014

Visual performance analysis

Eventually, every game needs one of these:


In order to get the game running at at least 30fps, it's important to know where time is being spent and where to focus optimization efforts.  Early on in the development of Solar Escape, I implemented a timer system to log how long various tasks take - it's a simple piece of code that I think I must have written dozens of times over the years.
  The coloured bars each represent an event in rendering the frame. These can be nested so more general events (update, rendering, etc) are shown higher up and more fine grain events (drawing an individual object, for example) are show further down.  When hovering over the mouse over a bar, the name and duration of the events is displayed and the event itself is high lighted. The yellow bars represent time blocks of 10 milliseconds. The green bars represent targets for 30fps and 60fps (if our general's ribbons are to left of both green bars, we're in a 60fps happy place). Solar Escape is a fast moving game and a nice smooth framerate makes all the difference when playing.
  This is all pretty straight forward but it is an invaluable tool and I wish I'd implemented the visualiser earlier on in the project - the real time feedback and whole-frame visualization allows us to rapidly determine where we're spending most of our time each frame and also to spot, at the time of the event, when issues arise. Debugging performance issues can be a pain partly because you can't debug these issues as you would other errors - setting a break point on a potential issue distorts timing calculations and doesn't often yield any useful answers when debugging performance issues.
  Also, printing out timing information in the console is often not very useful unless that data is formatted well and even then, it quickly becomes overwhelming. Furthermore, outputting a lot of text to the console tends to be more expensive than drawing the visualization seen above. I fill a vertex buffer each frame containing the vertex information for around 4000 events - that takes much less time than sending all that information textually to the console and it's easier to read, too. One issue that the performance timer revealed was that rendering the UI was as expensive as rendering all of the per-pixel shaded, post processed in game graphics. This was due to older code not feeding the GPU correctly and failing to batch data - if you rendered each rectangle individually instead of filling a large vertex buffer, you'd spend all of your time rendering the performance visualization which would kind of ruin the exercise.
 From the above screen shot, there are a few areas that need attention.  The large blocks of cyan and red represent Box2D's physics processing. It seems some physics objects are not being disabled when they leave out of the visible play zone and we're spending a lot of time there. The white and green blocks to the right represent older code performing scenegraph and partitioning recalculation - both of which have a lot of obvious areas in need of optimization.

  The first mistake I usually re-make each time I implement one of these is not using a high resolution timer. Fortunately both windows and Unix based systems support high resolution timers in the order of microseconds or millionths of a second (or even nano seconds). The standard resolution timer on windows only returns values in milliseconds (thousandths of a second). If you're implementing your own visualiser, make sure you use 'QueryPerformanceCounter()' instead of 'TimeGetTime()' on windows. Unixes can use the 'clock_gettime()'  function/

The most useful optimization that these kind of tools provide is of development time - making games is hellishly time consuming!


Monday, July 8, 2013

We should teach the beauty of Mathematics

Have a look at this link for Michael Gove's vision for mathematics education


Gove
In school, we learned how to multiply fractions. I can distinctly remember turning to my friend and saying 'Well, that's it then. We've learned maths. We know addition, subtraction, division, multiplication and fractions - what else is there?'. To my shame, I genuinely thought that I'd exhausted the subject. How could I be so incurious and arrogant to think that I knew everything about maths? Thirty years of learning later, I've mostly worked out how little I know. I'm not even sure the map of my ignorance is anywhere near complete.

   One thing I have learned is that Maths is far from the dreary subject we had to put with in school - it's beautiful, complex, universal, satisfying and the basis of (or at least useful to) just about every interesting vocation and to our very understanding of the universe. If we ever meet another space faring species, they'd be unlikely to speak any natural human language. I think that we would be able to communicate using mathematics, however: You'd be unlikely to get in to space without it.

   So how is it that our education secretary, Michael Gove, is harking back to look-up-tables and learn-by-rote. Times tables are heuristics, a small set of short cuts that do not scale well. Try asking a kid raised on times tables what 202 x 32 is - they can't, unless they have another method. As a kid, I worked out that you could split any complex multiplication in to simpler ones, honing in on the target number quite quickly. At the very least, you can get the magnitude quickly, even if you're off by a few smaller digits.

   I don't want to state the obvious but you only really need to know short cuts for multiplying by 2, 3 and 5, addition and that adding a 0 to the end of a number multiplies by 10.  You can composite answers using factoring and far less rote memorization - learning how to play with expressing a question in different ways in fundamental to learning to use mathematics creatively so that's a more important lesson than a head full of dumb tables.

202 * 32 = (200 * 32) + (2 * 32) 
200 * 32 = 32 * 100 * 2 = 3200 * 2 = 6400
2 * 32   64 
202 * 32 6400 + 64 = 6464 

Or a more 'time table' example:

7 * 9 = (7 * 10) - 7 = 70 - 7 = 63

 We teach kids times tables up to 12 and then stop - it's arbitrary and largely useless for anything than counting change whilst shopping. I'd rather we gave our kids the tools to aspire to something more fulfilling and worthwhile than merely the efficient purchase of consumer goods.

   There's nothing wrong with a look-up-table for a given task: Most programmers know powers of 2 off by heart (2, 4, 8, 16, 32 etc.) because that sequence is useful to our profession but more importantly, we appreciate why. The method and rational behind it is much more important than the mindless repetition of numbers.

landscape entirely generated by mathematics (c) Inigo Quilez
  My early experience of mathematics in school, as with many kids, was dull.  I did have a brief introduction to SMP, which was the most positive school mathematics experience I had and the polar opposite of Gove's Victorian rote learning. However, they they phased that out rather quickly.
Everything changed when I started teaching myself programming, particularly graphics programming and discovered how useful, how beautiful maths could be.

  If you have a fast computer and a modern web browser, check out ShaderToy. This website contains beautiful animations entirely generated by mathematics - there's no art or modelling software used to create these other than a text editor and the author's vision expressed through mathematics and GLSL shader code, which is all available for you to tinker with directly on the website.
  That's what schools should show kids - just look at this, this is what maths and programming can create: Stunning, beautiful flights of the imagination expressed in a few pages of code.

  We should be showing kids that their computer games are made from maths, how that third person camera using quaternions to interpolate orientation, how the light reflecting from that burnished metal is calculated using vectors and matrices and fresnel equations, how the A.I. is weighing up probabilities before deciding how to counter the player's move. It's all maths - times tables are a dull footnote. As interesting to maths as a pencil sharpener is to art. 

  And yet, they seem central to Gove's vision for the next generation's education in the UK. This is not the vector along which we should be heading. Gove has also been accused of side-lining arts and music in favour of his stunted vision of science - again, that is wrong. Teach the art and beauty in Maths and Science, teach the Science in art too - as ShaderToy shows, they're often the same thing.

  I have to conclude that either our current administration is either like my 9 year old self - ignorant to the true depth and beauty of mathematics as demonstrated by the fact that they place inordinate weight on archaic teaching methods or else they know exactly what they're doing and want to create a population as ignorant as the child I once was.

Saturday, June 15, 2013

When I'm trying to code something I typically start with one problem and end up with fifteen, one of which will involve regular expressions. Today, I wanted to revamp my old Clayworks website as it's a stuck-in-1999 embarrassment (not quite geocities bad but bad enough).
  I'm using sublime text for my HTML editing but I found that I needed to re-format my old code and sublime-text doesn't have that functionality built in.
  Sublime-text does have rather nice python integration for easy plugin development so I did a little search, found this chap's website (http://www.bergspot.com/blog/2012/05/formatting-xml-in-sublime-text-2-xmllint/) and adapted his code, which makes use of xmllint (a unix tool but here's a windows version: http://code.google.com/p/xmllint/).
  My version doesn't need the text to be selected (if text is selected, only that part will be beautified) and will shows a pop-up error message and also takes you to the error line.

Anyhow, here's the code:


import sublime, sublime_plugin, subprocess

def find_lint_error_line(errString):    
  startpos = errString.find("-:")
  endpos = -1
  err_line = -1;
  if startpos != -1:
    startpos += 2
    endpos = errString.find(":", startpos)
    if endpos != -1:
      numstr = errString[startpos:endpos]        
      if numstr.isdigit():
        err_line = int(numstr)        
  return err_line
 
 
class TidyXmlLintCommand(sublime_plugin.TextCommand):
  def run(self, edit):
    command = "XMLLINT_INDENT='\t' xmllint --format --encode utf-8 -"
    self.view.set_status('self', "")
    #xmllint.view.set_status('Hey there Tim', "Hey hey hey")
    # help from http://www.sublimetext.com/forum/viewtopic.php?f=2&p=12451
    xmlRegion = sublime.Region(0, self.view.size())
    p = subprocess.Popen(command, bufsize=-1, stdout=subprocess.PIPE, stderr=subprocess.PIPE, stdin=subprocess.PIPE, shell=True)

    sel_regions = self.view.sel()
    selection = sel_regions[0]
    sel_region_count = len(selection)
    if sel_region_count == 0:      
      selection = xmlRegion
      
    result, err = p.communicate(self.view.substr(selection).encode('utf-8'))    
    
    if err != "":          
      self.view.set_status('xmllint', "xmllint: "+err)
      error_line = find_lint_error_line(err)
      #err.parse()
      #lines[] = parse("line {}", err)
      if error_line != -1:            
        pt = self.view.text_point(error_line, 0)

        self.view.sel().clear()
        self.view.sel().add(sublime.Region(pt))
        
        self.view.show_at_center(pt)
        #self.view.set_viewport_position((0, error_line * 16), True)      
      else:
        sublime.message_dialog('could not find error line')

      sublime.message_dialog('xmllint, error at line: '+ str(error_line) + " \n" + err )

      sublime.set_timeout(self.clear,10000)
    else:
      self.view.replace(edit, self.view.sel()[0], result.decode('utf-8'))
      sublime.set_timeout(self.clear,0)

  def clear(self):
    self.view.erase_status('xmllint')


And if you're wondering how I did that nice syntax colouring on the python code, check this out: SyntaxHighlighter